
EHFKSWL
Autoencoder (오토인코더) 본문
Intro
이활석님의 오토인코더의 모든것 강의를 듣고 AE, VAE를 구현하였다. 강의에는 VAE 뿐만아니라, Loss function을 바라보는 두 가지 관점( Backpropagation, Maximum likelihood)에 대한 설명이나, Autoencoder에 대한 설명도 있는데 내용이 매우 좋다. 그래서 강의를 듣고 더 공부한 것들을 남겨보고자 한다. 이 주제에 대해서는 AE와 VAE 두가지 챕터로 나누어 설명할 것이다. Autoencoder는 많은 도메인에서 사용 중인 것 같은데 image processing(vision)에 좀더 집중하여 살펴보고자 한다.
보통 딥러닝 기초 강의를 들으면 Unsupervised(답이 없는 문제) 보다는 Supervised(답이 있는 문제) 예제를 먼저 접하게 된다. MNIST나 cifar-10 등이 그러한 것들이다. 그래서 supervised Learning에 대해서는 잘 알고 있다. 만약 Unsupervised Learning 문제를 접하고자 한다면 Autoencoder를 먼저 공부해 보는 것을 추천한다.
Architecture
먼저 Autoencoder의 구조는 다음과 같다.
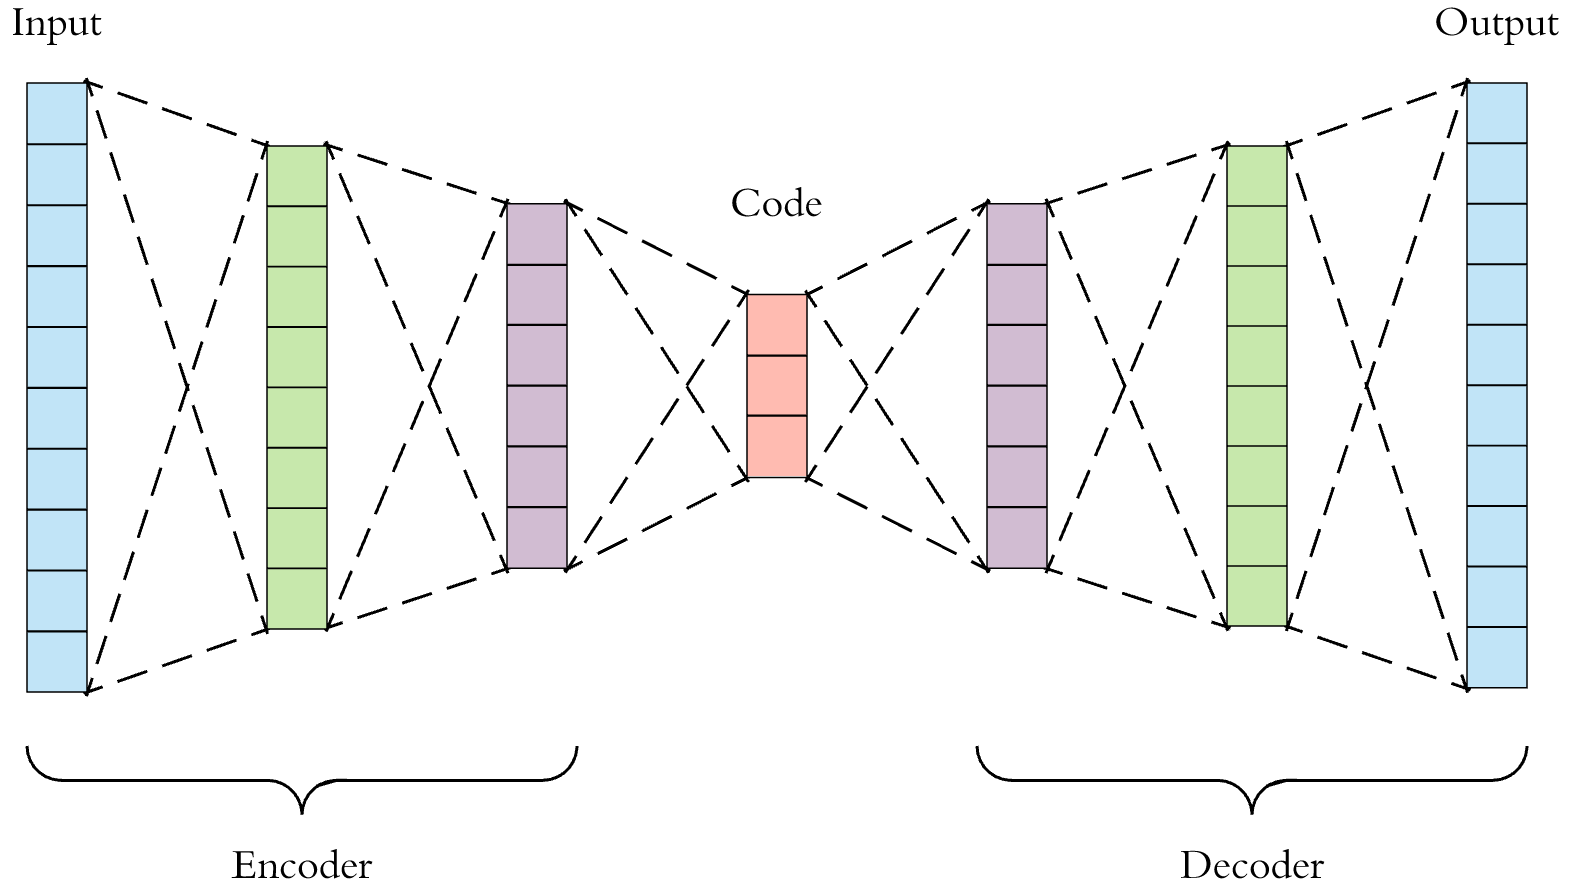
Autoencoder는 input x가 들어갈때 output으로 다시 x가 나오도록 학습시키는 구조이다. input과 output이 같으면 의미가 있나? 라는 궁금증이 생길 수 있을텐데 Autoencoder의 핵심은 위의 Code 부분이다. 즉 Code라는 latent vector가 x라는 입력값의 압축된 정보를 가지고 있다는 것이다. 그래서 Autoencoder를 dimensionality reduction 이라고 부르기도 한다. 오토인코더에서 input을 압축하는 앞단을 Encoder 라고 하며 압축된 정보를 가지고 다시 복원하는 뒷단을 Decoder 라고 부른다.
Unsupervised Learning이라고 이름을 붙이긴 했지만, 최종적으로는 비교해야 되는 output(자기 자신)이 있으므로 self upservised Learning이 좀 더 정확할 것이다.
이 Autoencoder는 다음의 용도로 사용된다.
- 데이터 압축 ( Lossy )
- Decoder로 Latent vector를 변화시켜 원본 이미지와 비슷한 fake 이미지 생성
- Denoising( nosie 제거 )
- Weight initialization( Stacked Autoencoding )
각각을 하나의 주제로 다뤄 볼 수 있지만 일단 VAE로 넘어가기 위해 이 부분은 생략한다.
Linear Autoencoder
가운데 Code 를 z, Encoder 함수를 h(x), Decoder 함수를 g(x) 라고 하자. 그럼 z=h(x)이고 y=g(h(x))가 될 것이다. input을 압축한 z를 Latent vector 라고도 한다. h(x)는 몇개의 Layer를 어떻게 구성하느냐에 따라 달라지는데 Dense를 사용할 수도 있고, CNN을 사용할 수도 있다. 예제 코드에서는 CNN을 사용하였다. 만약 Dense를 사용한 경우 activation function을 사용하지 않는다면 몇개의 Layer를 쌓더라도 1개의 Dense Layer를 사용한 것과 결과가 같아진다. (h(x)를 cx라는 일차 함수로 생각해보면 간단하다.) 활성 함수를 사용하지 않은 Autoencoder를 Linear Autoencoder 라고 하며 Linear Autoencoder는 PCA와 똑같은 sub space를 구성한다고 한다.
Loss
이제 모델의 구조를 봤으니 Loss function을 정의해야 한다.
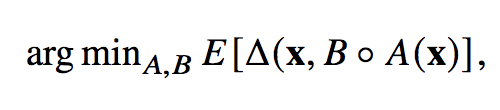
위의 B와 A는 각각 Decoder와 Encoder를 의미한다. 이 Loss function의 의미는 input x 에 대하여 모델을 통한 output과 기존의 x가 같아지도록 하는 A와 B를 찾는 것이다. 원본 데이터를 재구성하기 때문에 reconsturction Loss 라고 말하며 보통 L2-norm을 사용한다. 원본과 디코딩된 이미지 간의 MSE Loss를 사용한다는 것이며 Loss는 간단하다.
Code
Tensorflow 2.0으로 Autoencoder를 구현한 코드 전부는 아래 github에 있다.
https://github.com/DaeseungLee/Autoencoder
DaeseungLee/Autoencoder
Autoencoder를 mnist dataset을 이용하여 구현하였습니다. Contribute to DaeseungLee/Autoencoder development by creating an account on GitHub.
github.com
아래 코드는 Autoencoder의 구조이다. Autoencoder라는 클래스를 만들고 tensorflow.layers.Model을 상속받고 있다. 이렇게 만들면 autoencoder class의 input을 넣어주면 자동으로 call 함수를 불러와서 encode, decode를 거쳐 output을 내놓는다. tensorflow 2.0은 이런식으로 굉장히 쉽게 사용할 수 있다. ( 여러 class 모델을 만들어서 붙이고, 학습할 수 있다. )
class Autoencoder(Model):
  def __init__(self, encoding_dim):
    super(Autoencoder, self).__init__()
    self.latent_dim = latent_dim
    self.encoder = Sequential([
      layers.Flatten(),
      layers.Dense(latent_dim, activation='relu'),
    ])
    self.decoder = Sequential([
      layers.Dense(784, activation='sigmoid'),
      layers.Reshape((28,28)),
    ])

  def call(self, x):
    encoded = self.encoder(x)
    decoded = self.decoder(encoded)
    return decoded

autoencoder = Autoencoder(latent_dim)
'Deep Learning > Vision' 카테고리의 다른 글
| Manifold Learning (0) | 2021.05.13 |
|---|---|
| VAE (Variational AutoEncoder) (0) | 2021.05.13 |

